My Lovely Followers

Saturday 29 April 2017

Whimsy Stamps - Bunny Balloon

Hello!
No spotlight Saturday from me this week as I'm trying to catch up with other posts and clear some of the projects in my draft folder also. So today I'm sharing a sweet little shaker card using the new Bunny Balloon stamp from Whimsy's Kirsten Winkelbauer collection.

I paired this with the Big Balloon Celebrations die set to add a fun shaker element and the balloon string and Celebrate sentiment are from the Big Balloon Celebrations clear stamp set.

The white rectangle is cut with one of the Hand Stitched Nested Rectangles dies.


I've coloured her with my distress ink markers using Vintage Photo, Worn Lipstick, Antique Linen, Walnut Stain, Shaded Lilac, Dusty Concord and Mustard Seed.

The background paper is Maja Design,Vintage Spring Basics.
Sequins are a mix of Viola from Little Things by Lucy and Sunshine Mix from Simon Says Stamp.

That's all from me for today, thanks for visiting!

Friday 28 April 2017

Ninja-mazing

Hello!

I've been playing with the Ninja-mazing Stamp Set again, love these little ninjas, they're so much fun.
I started with a white card base and cut a large rectangle from some black cardstock with my Blueprints 15.

I cut a smaller white rectangle with Blueprints 20, and then cut out a circle from the centre and did some inlay die cutting, replacing it with a circle of red cardstock so that the whole looked like the Japanese flag.

I stamped 2 of the Ninjas from the stamp set on Bristol Smooth cardstock and coloured them with my Zig markers. This time I didn't use any water, just blending them with themselves for a stronger more opaque effect. Not quite such a subtle blend as Copics, but it's not too bad.

I cut them out with the matching dies and stamped a sentiment from the same set onto some black cardstock, heat embossing in white.


I cut that into a small strip and adhered on my card with some shallow foam tape and popping up the ninjas around it with some foam dimensionals.

I finished off with a few red glittery enamel dots.
Items Used:

Smooth white cardstock
Plain black cardstock
Plain Red Cardstock
Versafine Ink Onyx Black
MFT Ninja-mazing Stamp Set
MFT Ninja-mazing Dienamics
MFT Blueprints 15
MFT Blueprints 20
Versamark Ink
Detail White Emobossing Powder
Red Glitter Enamel Dots

Hope you like it!

I'll be back tomorrow with my Saturday Spotlight.

Thanks for dropping by!


Thursday 27 April 2017

I'm Glad We're Friends

Hello!

I'm still working my way through the cards in my draft folder that I built up a couple of months ago when I had some time on my hands.....whatever happened to that?!

This is a very simple card made with the ultra cute Snuggle Bunnies set from My Favorite Things, it's just so fun making cards with these.


I stamped the images with some Versafine Onyx Black and coloured them with my Zig Clean Color Real Brush Pens and cut them out with the matching Die-namics. I love these pens, but it can be quite tricky matching them to the papers and I broke my own rule here of choosing the paper first and then colouring lol. This was the closest match I could get from my stash.
I stamped the sentiment on some smooth white cardstock and I bridged the gap between the white and coloured papers with a strip of silver miri card. I popped the whole thing up a little on my cardbase using some craft foam. I decided where I wanted my pair to be and coloured the area that would be beneath them with a grey marker. Then I popped up the bunny and teddy with some foam tape and finished with a few grey and white enamel dots.

Items Used
Smooth White Cardstock
Versamark Ink
Watercolour Cardstock
Zig Real Clean Color Pens
Silver Miri Card

Thanks so much for dropping by!

Wednesday 26 April 2017

Friend you're the best

Hello!

I had a play with my MFT Blueprints 15 today to create a layered card with vellum.

I love adding vellum to my layers as it stops the card from looking too 'heavy', even with a few layers.

I white embossed a piece of 5.5 by 4.25 inch watercolour cardstock using the Wavy Colouring Book background stamp and then did some ink blending with my Distress Inks, I've listed colours and products at the end of my post.

Once dry I cut into the piece with the larger angled die from the set, giving me 2 pieces. I then cut a piece of heavyweight vellum with the largest die and layered that between my 2 inked pieces, covering the hole left in the base.

I added a die cut strip of cherry lustre cardstock to the side, white embossed a sentiment on a scrap of the vellum and cut that with the sentiment strip die.

I cut out my word once in cherry cardstock and several times in white and layered them together with adhesive and then lined the letters up above my sentiment strip.

Finally I finished with a few sequins.


Items used
Cold Pressed Watercolour Paper
Distress Inks - Antique Linen, Tattered Rose, Victorian Velvet, Aged Mahogany
Vellum
Smooth White Cardstock
White Detail Embossing Powder
Cherry Lustre Cardstock

Tuesday 25 April 2017

Technique Tuesday - Embossing and DI colouring on Kraft.

Hello!

The other night as I was walking home from the bus stop on what had turned into a nice sunny evening, I had to smile when I saw 2 community police officers on bicycles.

It was lovely to see them and they were pleasant and smiling, but as I passed them I did have to give pause to think......."I wonder if they know they're breaking the law by cycling on the pavement?".

Somewhat ironic.

But nothing to do with today's post, just the kind of random stuff that rattles around in my brain......let's get on with today's post.

Today's technique had me embossing and then colouring with distress inks on Kraft cardstock, something I admit I'd never attempted before. Because I didn't have anything fancy like buff coloured watercolour paper, or Neenah Desert Storm, I had to resort to plain old Bazill Kraft cardstock, which is quite delicate and very easily marked, so in an effort to make things a little easier on myself, I chose to do it in just one colour - Frayed Burlap.

It wasn't too bad actually, although I did err on the side of not adding too much and blending with an almost dry brush. I probably could have gone even darker letting it dry in between, but I really liked the look of it and I didn't want to spoil my hard work lol.


I used MFT's Funky Flower stamp set and matching Die-namics. I stamped quite a few of just the one type of flower plus leaves, and in the end I had enough for 2 cards.


For this 2nd card I switched thinks around and reversed the kraft and white cardstock on the base and frame, cutting a smaller layer of the white.

In the end this was quite a simple technique but I feel it looks really effective.

I've listed what I used below with links where I have them:

Bazill Kraft Cardstock
Smooth White Cardstock
Distress Ink Marker - Frayed Burlap
MFT Funky Flowers Stamp Set
MFT Funky Flowers Die-namics
MFT Pierced Rectangle Frames
MFT Blueprints 15
MFT Blueprints 20
Detail White Embossing Powder
Little Things from Lucy Jewels - Sparkling Vanilla Mix
Little Things from Lucy - Champagne Sparkly Shaker Selection

That's all from me today, enjoy your day and thanks for visiting!


Monday 24 April 2017

CASE a card Monday #2

Hello!

Since Kristina Werner was my Saturday Spotlight, I'm casing a make of hers for my CASE a card Monday today.

Here's a reminder of some of the ways you can CASE a card.

Just match the color combo.
Change the theme/sentiment.
Flip it horizontally.
Match how they used an embellishment.
Try the technique they taught.
Use their card as a “sketch” to start with.

Any or all of the above.
If you do CASE someone's card, please link back to the original in your post to give credit for the inspiration.

So this is what I made


and this is Kristina's make and I stayed pretty faithful to her original inspiration, stenciling on Kraft.


I used different stencils and some colours were similar and some different.

I backed my kraft pieces onto black cardstock, because I didn't white emboss my large word. Also I used a word die rather than a stamp using some lustre cardstocks that went with my inks, and I left a narrower gap around my kraft cardstock, but looking at them together now I think I prefer Kristina's larger 'frame'.

I did white emboss the rest of the sentiment onto black cardstock as Kristina did, but I just used one or a few small words on one small piece of cardstock rather than the 2 long pieces that Kristina uses, but the design is very similar and has taken a lot of inspiration from Kristina's work.I  I did also add a few sequins to my finished cards because...well embellishments...you know me 😉

This is what I used for my cards:

Plain Black Cardstock
Kraft Cardstock
Distress Ink Pads (I used 3 shades in a colour group on each)
Various stencils from my stash
Whimsy Shapeology Die Set - Sympathy, Heartfelt and Condolences
Versamark Ink
White embossing powder
Pretty Pink Posh Clear Sequins

I used word stamps from various sentiment collections, but if you wanted a good set to go with these word dies, the new Deepest Sympathy Set from Whimsy Stamps is perfect, I just don't have this one yet.

Here's some individual photos of my cards for a closer look


If you would like to see how Kristina made her cards, I have also included a link to Kristina's YouTube post below.

YouTube Link

I hope you enjoyed seeing how I cased Kristina's work, I'll be back tomorrow with another Technique Tuesday.

Thanks so much for dropping by!


Sunday 23 April 2017

Whimsy Stamps - Wee Stamps - Freesia

Hello!

Now I have some free time and the internet seems to be behaving a little better, I'm catching up on some makes from the last few weeks.

This post also serves as a reminder for The Ribbon Girl  April Use Any Image Challenge.

You can find the challenge here, and you still have a week to enter your project, you make any project as long as it has an image on it.

My card today uses Freesia, from the Whimsy Stamps, Wee Stamps collection.


This cute little bunny was released in March and although it was perfect for Easter makes, I think it works just as well for birthdays and other occasions. So a birthday card is what I made using a sentiment from the newly released Vintage Birthday Frames Sentiment collection from Whimsy Stamps.

I coloured my little bunny with my distress ink markers.

I also used the following items from The Ribbon Girl


That's all for today but I'll be back again tomorrow, have a great Sunday!


Saturday 22 April 2017

I Spy - MFT Sketch Challenge 329


Hello!

I was inspired by the sketch from this week's MFT Sketch challenge and managed to find a bit of time to play along.

I recently bought the adorable Ninja-mazing stamp and die sets from MFT and I wanted to create a bit of an Japanese looking theme on the card to go with the set.

Stamping in black ink on red...check...but what to use? I decided that the Wavy Coloring Book Background Stamp would create the effect I was after. 

I turned the sketch horizontally and changed the size of some of the elements a little to make my card.

To create the little scene in the centre of my card I first made a mask with a circle centre and used MFT Red Hot premium die ink and my blender to make a sun and then stamped an image from the stamp set over the top with Onyx Black Versafine Ink and coloured in with a C7 Copic marker. I layered this on top of some vellum.

I stamped and coloured my Ninja, (don't faint but I coloured him with Copics, I dug them out, but I've given away several and didn't really have enough shades of grey for the black, so I had to make do with a C2 and a C& only lol),  and tucked him behind the layers when I glued them to the centre of the card. I cut a thin strip of black cardstock and then stamped and cut my sentiment and added that to my card. I finished with a little Shuriken.

This was the original Sketch
Sketch Challenge 329 #mftstamps

I used the following MFT products:

MFT Wavy Coloring Book Background Stamp
MFT Ninja-mazing Stamp Set
MFT Ninja-mazing Dienamics
MFT Double Stitched Rectangle STAX
MFT Premium Dye Ink Cubes Set 9
MFT Stitched Sentiment Strips Die-namics

If you want to enter yourself you can find the challenge here

Thanks for visiting!


Saturday Spotlight - Kristina Werner


Hello!

It's time for another Saturday Spotlight. Due to work pressures leading up to the Easter Holidays and a visit from my Mum over Easter, I've missed the last 2 weeks of these, but I'm back today with someone that you have probably already heard of, but whom I only discovered this year.

Kristina Werner

K Werner Design

This lady has talent by the bucket load. Not only is she a fabulous crafter and cardmaker, she does the most amazing lettering and calligraphy. She also designs a range of stamps and dies for Simon Says Stamp.

She's innovative and does lots of fab watercolour backgrounds and colouring which I love.

You can find some examples of her work below, and below those I've added links to her YouTube, Blog and Instagram. Really if you've never heard of her or you are unfamiliar with her work, I really recommend that you check her out because she is truly inspiring.


Kristina's Blog
Kristina's YouTube
Kristina's Instagram

Go leave her some love.

Well that's all for today, but don't forget that I will also do my Case a Card Monday where I will case one of Kristina's wonderful works.

I'll be back later today with a card for this week's MFT Sketch Challenge, so see you later!

Thanks for visiting!


Friday 21 April 2017

Ham it Up

Hello!
 I made this card some weeks back for my best friend's birthday but haven't really had a moment to share it until now
She is a big fan of a punny sentiment, as she comes from a whole family of punsters, so I thought this card was perfect for her.


I kept it fairly simple, stamping my images From the Hog Heaven stamp set in Versamark Ink on Strathmore Bristol Smooth paper and colouring them with my Zig Markers and water. I added a little sparkle to the icing with my Wink of Stella pen.

I made an American A2 size card, vertical top folding and cut a piece of patterned paper from the Sweet Celebration paper pack, with the largest Die from Blueprints 15 and gluing that directly to the card base.

Then I used one of the Mini Scallop rectangles with some smooth white cardstock and cut out a circle. I framed the circle with some more smooth white cardstock cut with a Stitched Circle Scallop Frame and cut a small circle of smooth white cardstock for the middle.

I stamped a sentiment from the set in Razzleberry Ink from the 
Dye Cube Inks Set 9 in the lower right corner of the white rectangle and popped that up on my patterned paper with some foam tape, popping up the small circle at the same time.

I fussy cut my pig and cupcake (if you aren't confident with fussy cutting, you can purchase a matching set of dies for these), and added them to my card with some foam dimensionals.

Finally I finished with a few sequins from Little Things by Lucy.

Thank you so much for dropping by!


Thursday 20 April 2017

Baby I Can't Wait to Meet You

Hello!

I'm sorry I've been rather absent lately, life just got really busy. Work is kind of mental at the moment and I've been giving the spare room a bit of a makeover to finally give myself a dedicated craft room while also retaining the use as a spare room for when family visits. The planning for that was not easy I tell you! Then just recently my Mum came for a visit and naturally all my attention was for her.

My room is now done, my Mum has returned home and while work is probably still going to be mental for a while, at least I've had a chance to recharge my batteries, so you should be seeing more of me now hopefully.

I have a fair bit of DT work to catch up on, but in the meantime I have a LOT of CAS cards in my draft folder to share, so I'll do this over the next couple of weeks as I catch up with everything else.

I bought the MFT Bundle of Baby Clothes dies as soon as they came out because I just fell in love with them. I also liked the idea that you could create quick cool cards with no colouring involved, cutting out a time consuming step. Don't get me wrong, I love colouring, but sometimes I just want to pick up stuff and start creating without going though the colouring process first.

I've actually made several different cards with these dies, they are so versatile, and whilst I've made all 'New Baby' cards, there's no reason why you couldn't use them for a baby's first birthday as well as birth, baby shower and christening cards.


I just used the bib and washing line dies from the set in this card, I also used a few different products and I've listed them below along with links to where I bought them in the UK where available.

Smooth White Cardstock
Bubblegum Pink Cardstock
MFT Bundle of Baby Clothes Die-namics
MFT Blueprints 20 Die-namics
MFT Stitched Sentiment Strips Die-namics
MFT Stitched Scalloped Basic Edge Die-namics
MFT Farm Fresh Gingham Paper Pack
MFT Sweet Celebration Paper Pack
Versamark Ink
MFT Welcome Baby Stamp Set
Detail White Embossing Powder
Memory Box Alphabet Soup Die Set
Collall All Purpose Glue
Craft Foam
Foam Tape
Multi-Medium Matte Adhesive
Pretty Pink Posh Sparkling Clear Sequin Mix

That's all for today, but I'll be back tomorrow with another fun card.


Thursday 13 April 2017

Whimsy Stamps April Release Day 2

Hello!

It's day two of the fabulous new April release from Whimsy Stamps.

I have to admit falling in love with this stamp as soon as I saw it.
It's called Love Ewe by Krista Heij-Barber so quirky and cute and I just had to colour it up in some super bright and happy colours. So I turned to my Zig Clean Color Real Brush Markers. I need to start noting these babies down when I use them because they are not as familiar to me as the Distress Markers, so it's hard for me to tell which ones I used.


I also used some brightly coloured plain and sparkle cardstock and made a frame using a die from the Shaker Builder - Sweetest Birthday set and finished with some enamel dots, these are from Whimsy Stamps Summer Breeze  pack.

Thank you so much for visiting!

Wednesday 12 April 2017

Whimsy April Release Day 1

Hello!

It's that time again, time again, Whimsy's new release is here and what a fab release it is. We have some great products to share with you and I'm kicking off the fun with one of my favourite artists to colour, Sylvia Zet. Sylvia is the artist behind Whimsy Stamps Wee Collection and there is not a single one of these stamps that I do not like. Today's stamp is no exception, it's called Loli and Shellie, Shellie being the little snail. You can catch the new stamps here.

I wanted to keep this clean and bright looking, so I chose some pretty Lemoncraft Forget me Not papers and coloured my image with my distress ink markers to match. I decided that I don't colour redheads nearly enough, so I gave her a lovely head of titan hair.

Colours:
Skin: Tattered Rose, Vintage Photo, Worn Lipstick
Hair, Rusty Hinge, Vintage Photo
Clothes & Flowers: Pumice Stone, Mermaid Lagoon, Tumbled Glass, Mowed Lawn
Snail: Frayed Burlap, Brushed Corduroy

I also added lots of lovely goodies from The Ribbon Girl:

Cheesecloth
Ophelia Lace
Malibu Blue 25 mm Satin Ribbon
23 mm Turquoise/White Spot Organza ribbon
20 mm Ivory Open Rose
30 mm Ivory Wild Rose
Small Blossom Turquoise
Rose Leaves

Thanks for dropping by!


Sunday 9 April 2017

Floral Waves

Hello!

Well I'm finally here with you again. Combine a busy work schedule with coming down poorly and then my PC refusing to aknowledge my IP address and find the internet.....it's been a bit of a stressful week lol.

Because I wasn't able to access the internet yesterday until late, I missed my Spotlight Saturday, so that will have to wait until next week.

In the meantime I'm sharing with you a card that I almost lost....yes that's right, I thought I'd lost this.
After colouring her up and sharing a WIP on Instagram I tidied away while making the transition to my new craft room/guest room and then I could not find it anywhere.
But yesterday when I couldn't get on the net, I was organising stuff and voila! there was the card I'd started making. So I finished her off quickly so I could share her with you today.


As I lost this for quite a while, I can't remember exactly which markers I used, but these are most of them.

Skin:   Vintage Photo
Hair:  Seedless Preserves
Dress & Flowers:  Spun Sugar, Picked Raspberry


Products Used


Thanks for dropping by!

Tuesday 4 April 2017

Technique Tuesday #15

Hello!

Wow, I can't believe we're already at #15 for my Technique Tuesdays, how fast is time flying?

Today I'm sharing a vellum shaker card with stenciling on the vellum.

Stenciling, or indeed stamping on vellum can be a bit problematic. Because the vellum isn't porous, ink tends to stay wet on it for a very long time (and don't stamp with Versafine ink because this doesn't seem to dry on vellum at all!), and so has the tendency to smudge as it moves on the surface. Stamping and embossing seems to be fine as Versamark ink is very sticky and you are then heat setting your powder of course. 
As you can see a few of my dots are a little blurred at the edges where the ink moved, but as I used an irregular dot pattern, this doesn't detract too much.


I used lots of different colours of ink in a random pattern, this is distress ink as I wanted it to look quite translucent, but you could use your favourite colour inks.
Once I'd stenciled my piece of vellum I stamped my sentiment where I wanted it with black ink and heat set to help it dry faster.
I cut a frame from some pink lustre card stock and glued that to my vellum window, then attached a double layer of foam tape around it, making sure not to leave any gaps, dusted the inside edge of my foam tape with some anti static powder to make sure my sequins didn't get stuck to the sides, and filled with a mix of sequins in colours to match my inks.
I adhered a piece of white card slightly smaller then my frame to the back and then glued the whole thing onto my card base.

I cut 2 layers of white cardstock and one in lustre pink with the You die and adhered them together, then adhered to the top of my vellum, underneath my stamped sentiment.

Finally I added a few enamel dots to finish.

Items Used:

SSS Irregular Dots Stencil
Clarity Stencil Brushes
Smooth White Cardstock
Heavyweight Vellum
Pink Lustre Cardstock
Distress Inks Various Colours
MFT Pierced Rectangle Frame
Double sided foam tape.
SSS You Matter Clear Stamp Set
SSS You wafer thin die
Whimsy Summer Breeze Enamel Dots

That's all for today, thank you so much for dropping by.


Monday 3 April 2017

CASE a card Monday


Hello!
Did you see my post on Saturday where I started a series of posts spotlighting crafty folk that I admire? If you missed it you can find it here.
I thought that as a spin off to this series it might be fun if I pick a card from that crafter to put my own spin on, and share that with you on a Monday.

Don't know what CASEing a card means?

CASE stands for copy and share everything, but usually people don't just do a straight copy of someone else's work as this is generally frowned upon....so what does caseing a card actually mean? Well usually it means that you take inspiration from somethings or things you see in the work you are caseing.

Here's some examples:


Just match the color combo.
Change the theme/sentiment.
Flip it horizontally.
Match how they used an embellishment.
Try the technique they taught.
Use their card as a “sketch” to start with.

That being said I've actually taken inspiration from 2 of Laura's cards rather than one.


Here's what I did, and at the end of my post I've shared Laura's original work and linked back to her post on her blog.


So which cards of Laura's did I take inspiration from?

From this card I took the colour combo,  the ink blending and emboss resist.

SSS-Kristina's Love

and from this card, I took the basic layout (though I flipped it horizontally and used some speech bubble dies for the sentiment), and the stamp and die set and background stamp.

SSS-You Matter:

What I used to make my card:

Smooth white cardstock
Tim Holtz Watercolor Cardstock
Versamark Ink
SSS You Matter Stamp and Die Set
Fine detail white embossing powder.
Distress Ink: Pinked Raspberry, Blueprint Sketch, Mermaid Lagoon, Cracked Pistachio
Purple Sparkle Cardstock
Whimsy Stamps - Say What? Speech Bubbles Dies
Lucy's Little Things Jewels -Ice Cube Mix
Pretty Pink Posh Sparkling Clear Sequins


So there you have it. If you would like to join in the fun, please leave a link to your post in the comment section below, and I will pop across and visit you and leave you a comment.

Thanks for visiting!


Sunday 2 April 2017

Sending Love

Morning!

It's time for a new challenge over at The Ribbon Girls' blog, and as I missed my own team's 'Any Image' challenge in March (I won't be sorry to see the back of March, it's been exhausting!), I thought I'd join in with a DT make for this month's Card Challenge also.

So this is my make. 
I made a 5.75'' by 5.75'' ivory card base and used some lovely papers from the Lemoncraft House of Roses pad, which I inked with Walnut Stain DI and distressed.

I painted the chipboard frame with some liquid pearls to give it a lovely shimmer and shine, though you can't really see it well in the photographs. I see that Mary is now stocking this in a gold colour too, so I will have to try that.

I stamped out 2 butterflies and a sentiment from the Whimsy Stamps - Flight of the Butterflies clear stamp set with Versamark ink on some vellum, and heat embossed them in gold.

I fussy cut the butterflies and cut out the sentiment with a fishtail banner die.


I cut out a circle from the base paper and popped that up on the doily with some craft foam and adhered to the centre of my card.
After positioning my sentiment, I hid the glue beneath the vellum with some flowers and a little bling. I've listed my embellishments below with links to the store.

15 mm Gold Diamante Flat Back

I do hope you can join in with our challenge, there are lovely prizes to be won, and don't forget to go and drool over the rest of the lovely makes.

Thanks for dropping by!

Saturday 1 April 2017

Saturday Spotlight - Laura Bassen

Hello!

I thought it might be fun to start a new feature on my blog called Saturday Spotlight. What's this I hear you ask? Well over the last few years I've met a lot of different crafters and also 'found' them on Pinterest or Blogs or Intsagram or Facebook.
Because there are so many different talented people out there, sometimes we are bound to miss some, so I thought it would be a great idea to introduce you to some of the people that have inspired, influenced or just outright amazed me.

Some of these people may be familiar to you, but hopefully I'll expand your horizons a little and introduce you to someone new! Also, since obviously there are talented people out there that I haven't come across too, please feel free to make suggestions as to others out there that you think would be good to spotlight. I can't promise that I will (I already have quite a long list lol), but I will certainly go check them out if they are new to me.

So for my very first Spotlight Saturday I'm going to talk about


I've never actually met Laura in person and I've not been on any design team's with her, but after seeing some of her work on Pinterest, I followed her YouTube channel and then her blog and Instagram.

Laura's work is fantastic, it usually involves great use of bright colour, clean and simple design and often innovative features. Much of my recent love for ink blending is inspired by this lady.

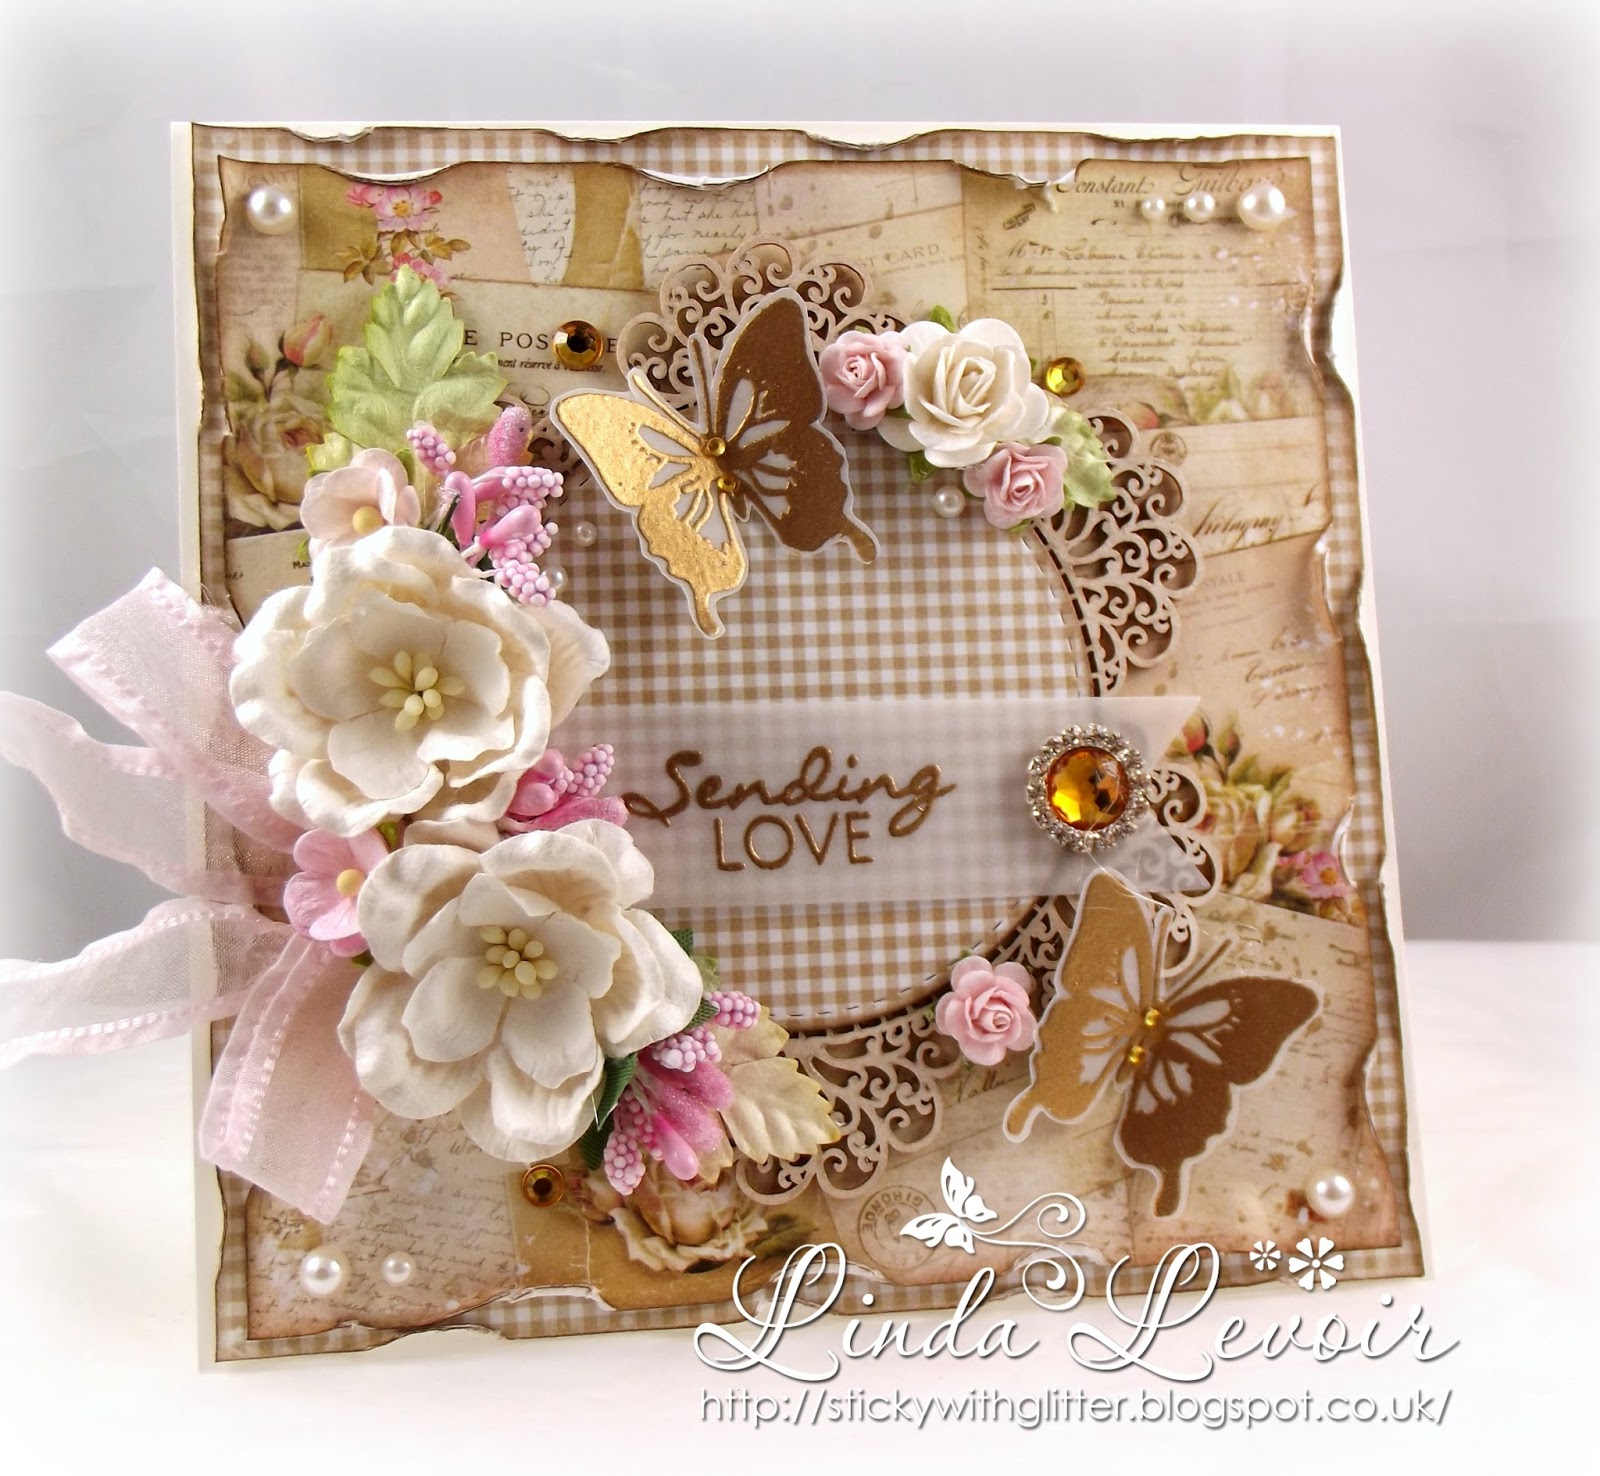
I've included below some of MY favourite pieces of Laura's work, and also links to her blog and social media.

SSS-My Kind of Peep card by Laura Bassen using the March Card Kit:

SSS-You Matter:

Love You to Pieces:

#Repost @laurafadora with @repostapp ・・・ Another gorgeous STAMPtember…:

Not only does Laura make some fabulous creations, but her personality on YouTube is a hoot! Even if I wasn't a fan of her work I think I would watch her on YT just for fun as she never fails to cheer me up. She's a bit of a waffler like me which I can totally relate to, but she's just sooo funny and her love of her family really shines through.

You can find Laura's work on her

Blog
YouTube Channel
Instagram

So I hope that you've enjoyed the first in my series, and that I may have introduced you to someone you weren't aware of or re-awakened your interest. Even if not, I will have many other wonderful crafters in my spotlight over the next few weeks, so you may spot people you know, someone new and exciting (to you at least), or maybe even yourself! Who knows?!

Thanks for dropping by